The first portal into the knee joint must allow the surgeon to orientate and introduce the next instrument in a logical fashion.
First published by knee surgeon Angus Strover in 2008, and reviewed August 2023 by Dr Sheila Strover (Clinical Editor)
Arthroscopy - that critical first portal
The first portal into the knee joint must allow the surgeon to orientate and introduce the next instrument in a logical fashion.<
First published by knee surgeon Angus Strover in 2008, and reviewed August 2023 by Dr Sheila Strover (Clinical Editor)
For a 'diagnostic' arthroscopy, usually three portals (keyholes) suffice to examine the knee fully. For arthroscopic surgery itself, sometimes a fourth may be necessary to deal with some particularly tricky problem.
What do I mean when I talk of a 'diagnostic arthroscopy'? Well, in the early days of arthroscopy, when experience was hard to come by and arthroscopic instrumentation was less sophisticated, orthopaedic surgeons frequently used to look around the joint with the arthroscope to see if they could figure out the problem inside the knee. They did not actually perform any procedure. Depending on their findings, they then either opened the knee themself and dealt with the problem (for example, if there was a simple meniscal tear), or they would terminate the surgery and refer the patient to someone more skilled (for example, if there was a torn cruciate ligament). This first 'looking around' became known as a 'diagnostic' arthroscopy.
I am, however, using the term in a different sense. I am referring to the first part of an arthroscopic procedure, when the surgeon follows a routine of examination EVEN THOUGH HE SHOULD ALREADY HAVE A GOOD IDEA OF WHAT THE PROBLEM IS AND BE ABLE TO DEAL WITH IT. There may be more than one thing wrong. He may need a good look around to plan his second and subsequent portals. I believe there is very little place for using the arthroscopy as part of a two-stage procedure, and absolutely no place for the beginner to look around if he is not competent to deal with any problem that he may find.
The issue is that such an inexperienced surgeon is just the one who will miss locating the problem in the first place. If a surgeon needs experience, the place for it is at the side of a more experienced surgeon.
Have you ever had an arthroscopy and then been referred to another surgeon to actually carry out the surgical procedure? This used to be very common. I believe that there is no longer any place for this. An arthroscopy, even if nothing else is done to the knee, is still a surgical 'insult' to the knee and the patient runs the risks inherent in any knee surgery - such as infection, deep vein thrombosis, an anaesthetic complication, reflex sympathetic dystrophy. Why then force the person into a second procedure? If the surgeon is not competent enough to deal with the pathology (that is, the problems inside the knee), then he should not be doing the arthroscopy in the first place.
Why is the first portal so important?
Well, because it is done 'blind' - until the arthroscope, with its fibre-optic light beam and camera, has been inserted the surgeon can only see the outside of the knee. So if this is badly placed:
I teach my students and knee fellows a simple method of marking the skin prior to the surgery, so that the patella and safe portal positions are easy to locate, even after the knee has been inflated with fluid and the landmarks distorted.
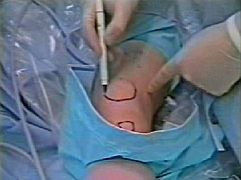
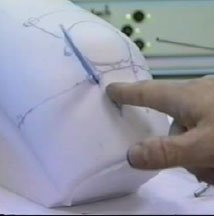
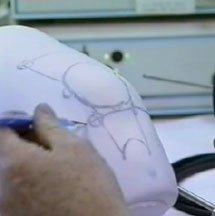
Here you can see the knee is draped with sterile drapes, and a sterile marking pen is being used to mark the knee.
The drape has a collection system, as you can see, as a lot of irrigation fluid leaks out during the surgery, and without this special drape it can go all over the surgeon's legs and onto the floor!.
I will take you through the method of knee marking in detail.
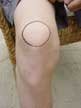
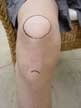

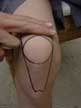
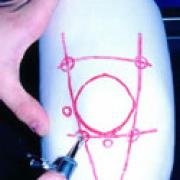
Here is how I mark my portals:
Very occasionally I might choose to use two other portals - one just below the patella in the midline, and one to the side of the patella.
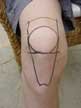
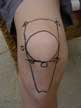
Here is a view of me using the rubber knee model which we developed for teaching surgical skills at the Knee Foundation.
It is an excellent teaching aid and is waterproof, with superb internal anatomical detail.
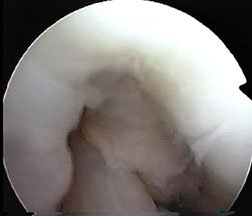
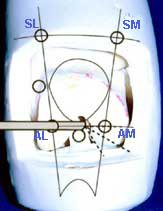
On the left ois a close-up photo of the notch area taken during arthroscopy. The cruciates are just entering the picture at the bottom.
On the model on the right, the circles represent the portals:
If this is a right knee, have a guess and tell me which portal is the arthroscope being introduced into? Answer: It is the antero-lateral (infero-lateral portal). I usually use start with the antero-lateral portal. The lateral side of the knee is the outer side - where you would slap your thighs.
Now, getting back to the point I made earlier- that the first portal is made blind.
The surgeon needs to appreciate the underlying anatomy so that he does not damage the knee when inserting the scalpel blade for the first portal.
Also, these simple systems will help to prevent damage to the internal structures:
It sounds simple, but I cannot tell you how often I have seen on the soft joint cartilage the tell tale scrapes of previous blunders by surgeons with careless method.
So, just a little recap.
The portals are marked. Some local anaesthetic with adrenaline has been injected into the skin around the portal. The knee is pre-inflated via a needle attached to a drip containing irrigation fluid. The antero-lateral portal has been chosen and a thin needle inserted to make sure that the scalpel will not hit any of the structures inside the knee.
The surgeon takes the scalpel, with his fingers protecting it from going in too deeply, and cuts the first portal in the direction he now knows to be safe. The scalpel is removed.
The arthroscope, containing a blunt trocar to protect its sharp edge, is inserted in the same direction into the knee. The blunt trocar is removed and the light source turned up.
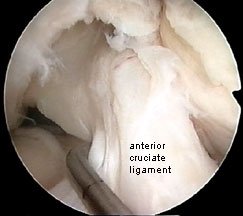
An image appears on the TV screen.
Here again you see the notch between the two condyles, this time with the cruciate ligament labelled for you. You are looking from an angle, remember, and looking towards the medial femoral condyle on the right, while you can see on the left just an edge of the lateral femoral condyle.
The image is round. Why? Because it is being relayed to the camera via the round arthroscope.
We've got to the end of this fourth lesson, now.
I'll just run over a few key points so far:
In Part 5 I will show you how careful placement of the second portals optimises the positioning of the instrumentation and allows the surgeon to continue without any problem.